Announcement

Collapse
No announcement yet.

Game Hoist

Collapse
X
 
  • Filter
  • Time
  • Show
Clear All
new posts


    Totally original design....

    Thanks for the ideas Dale, after some discussion on another site, while there might be some strength increase running to the ground a few new issues are created and they suggested welding a trailer jack to it if it squatted the truck too far before breaking.

    Comment


      Like the ability to leave it in and not bottom out similar to what you used dale but instead of running pipe using the square tube, and then copied the pivot from andy as it seemed pretty simiple.

      i know you get more strength running the cable behind but with the winch I thought it would be a bit easier in front.

      Figured it would keep more weight lower, but also break apart into two pieces that were a bit more manageable.

      Comment


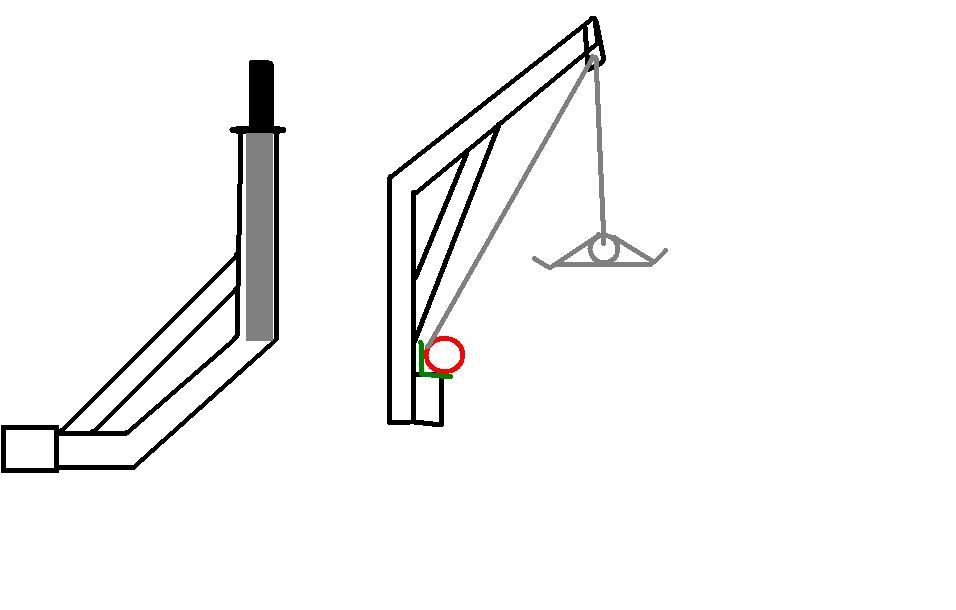
        That's the basic design of mine....the grey part being 1 1/2" solid bar stock.

        Mine is all 2" tubing as well. The heavy wall tubing has round corners making it look like pipe in my bad pictures.

        The piece coming out of the hitch and the 45deg piece is 1/4" wall.
        The brace from near the receiver hitch, on a 45 up to the top of the pivot is light wall....16ga I think.
        The verticle pieces are 3/16" wall (that's the heaviest that the 1 1/2" bar will slide into).
        The top boom piece is 10ga, and the brace for it is 1" 14ga wall.


        I used 3 set collars for the 1 1/2" bar stock to pivot in. There's one welded to the top, and bottom of the 3/16" tubing verticle piece on the bottom. And there's one welded to the bottom of the top verticle piece. The 1 1/2" bar is welded to the top piece. I ran a small bead of weld all the way around it to make it fit snugly up in the 3/16" tubing. Then I drilled a 3/4" hole in the 3/16" about where the winch is and welded the top end of the 1 1/2" to the tubing. This all makes the pivot very smooth and tight. The set collars come with a threaded hole, and allen head set screw, which I replaced with a bolt and welded a T handle to it so I can lock the pivot in one spot.

        I wish I had taken pictures with an actual camera, maybe I can get some this weekend.

        Click image for larger version

Name:	setcollars.jpg
Views:	1
Size:	32.8 KB
ID:	24031898
        Last edited by Dale Moser; 11-29-2011, 12:04 PM.

        Comment


          i guess the final kicker is I know yours is pretty new but is having two "halves" easier to deal with than one solid piece? Since I Assume you don't take the bottom collar off?

          Comment


            It would be a monumental pain to deal with in 1 piece. Heavy wall tubing and solid 1 1/2" bar is pretty weighty stuff.....I think there's 22" of that bar stock in there!

            Comment


              Isn't it still obnoxious with all of the steel tubing up into your unit? I was planning on running my steel rod down to keep some of the extra weight lower. Especially with the added weight of the electric winch.

              Do you see one way being better than the other?

              Comment


                Originally posted by scott123456789 View Post
                Isn't it still obnoxious with all of the steel tubing up into your unit? I was planning on running my steel rod down to keep some of the extra weight lower. Especially with the added weight of the electric winch.

                Do you see one way being better than the other?
                It would be better balanced, weight wise, with the bar welded solid to the bottom piece. But it would have more slop in it because there's no way to make the top of the rod fit tight in the tubing (like having the bottom riding in 2 set collars, and the top in 1 and being welded).....and still be able to remove it. I did the last 2 I built that way, they worked, but were a lot sloppier and probably not as strong as this one.

                Comment


                  This summer I built mine based on Slackers build (A Big Thanks Slacker !)...with only a few very minor changes....ie. I used a dual action 3000# manual winch and I can remove the cable from the hoist , reposition the winch on it's receiver so that it is in line with a snatch block on the headache rack thereby using the winch to pull an object...Moose, busted 4-wheeler , heavy log(whatever) up a ramp and into the truck box .
                  Sorry no pictures as yet...

                  Comment


                    oooops!
                    Last edited by farfromTexas; 12-06-2011, 08:26 PM.

                    Comment


                      Originally posted by farfromTexas View Post
                      This summer I built mine based on Slackers build (A Big Thanks Slacker !)...with only a few very minor changes....ie. I used a dual action 3000# manual winch and I can remove the cable from the hoist , reposition the winch on it's receiver so that it is in line with a snatch block on the headache rack thereby using the winch to pull an object...Moose, busted 4-wheeler , heavy log(whatever) up a ramp and into the truck box .
                      Sorry no pictures as yet...
                      You got time to post here, you got time to take pics! Let's see em.

                      Comment


                        Originally posted by slacker View Post
                        You got time to post here, you got time to take pics! Let's see em.
                        Hey Slacker....my hero!
                        That sucker is HEAVY ! But when I get time (deer hunting you know.... my SIL and I got 2 today....3 more to go)) I most certainly will post some pictures !
                        And thanks again for your posts on the hoist .....very, very helpful .

                        Comment


                          TTT......For this year game animals.....Andy

                          Comment


                            Originally posted by slacker View Post
                            I did my hoist a little different. It mounts in the bed. There is also a plate under the truck, these two plates sandwich the bed. The lower section slides through the tube on the bed rail and into the base plate.
                            [ATTACH]2860[/ATTACH]
                            There is the slide in lower section and then the jib.
                            [ATTACH]2861[/ATTACH]
                            Lower section in place. That is a 1"5/8 cold roll rod as a swivel and break down point. The jib rotates on a plate rather than the tube itself. the plate has holes for a pin to lock the hoist in any direction.
                            [ATTACH]2862[/ATTACH]
                            Everything in place.
                            [ATTACH]2863[/ATTACH]
                            Inside view of the winch and control in it's holder.
                            [ATTACH]2868[/ATTACH]
                            Side view of winch, pinned in place.
                            [ATTACH]2864[/ATTACH]
                            Winch.
                            [ATTACH]2865[/ATTACH]
                            Trolling motor plug.
                            [ATTACH]2866[/ATTACH]
                            Trolling motor plug in bumper.
                            [ATTACH]2867[/ATTACH]
                            In action.
                            [ATTACH]2875[/ATTACH]
                            The hoist is a one man setup and breaks down to store.
                            Very cool ideas. I may have to use them if you don't mind

                            Comment


                              ttt for this years builders

                              Comment


                                Might give somebody a few ideas, I'm not sure if their in this thread or not.
                                Attached Files

                                Comment

                                Working...
                                X