I own a set of rubydod arrows, shoot good from my recurve and extra good from my long bow!!! I like them!
-
-
I havn't changed my arrow making technique in twenty plus years. I want simple, easy to make arrows that last and fly well. I use Watco Danish oil finish with stain in it. I rub it on by hand, one thick coat and let dry. Go over it with 4/0 steel wool and start fletching. When you cut the shafts off you can see where the finish soaked in the wood about 1/16" so you know it's well protected from moisture. Almost any glue works with it as well.
If you want to add weight to the front of the shaft, after cutting, just stick about 4" of that end in a tube of Watco and it will soak through the shaft and add about 30 grains of weight, depending on the density of your shafts.
If I am buying precut feathers I 3 fletch, 5". If I am chopping out of full length feathers the I 4 fletch 4" as you get two feathers out of one full length. That way it comes out cheaper and doesn't matter a bit.
I don't crest any more as I just don't care and it takes too much time.Comment
-
Originally posted by rubydog View Post !!!!! No Rubydog secrets??????? That just ain't right!!!!!!!!!!!!!!!!!!
Comment
-
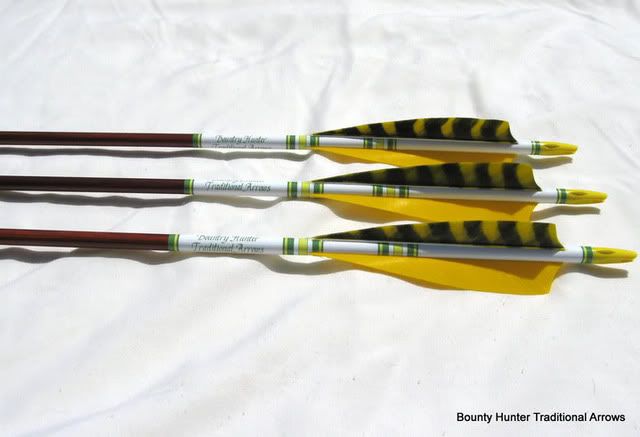
Equin wraps work and look just fine on wood. It is up to the shooter and what they want. I have done a lot of wood arrows for folks with wraps it is a lot cheap then dipping and cresting. Here is the last set I did with wraps.
Comment
-
Wow, beautiful arrows, Bountyhunter! I saw some "traditional" style wraps from onestringer and 3Rivers that look good, too, but for now I'll just stick with plain arrows til I get the hang of it.
Thanks for the great tip, Draco, on Watco oil finish and how to get another 30 grns of weight added up front.
And thanks a bunch, Terry, for offering tips from the arrow master himself! So will you be so laid up you won't be able to make arrows for awhile? Hope you recover soon.Comment
-
Anyway, on to my next question. Last night I screwed up the final 3rd 5" fletching on my first shaft, and this after practicing on wood dowels with some left-over vanes! What's the best way to remove that fletching without scraping and scratching up the wood shaft? Just go slow and careful with a knife and then carefully sand down the glue residue?Comment
-
Yes I will. I can't even make them now and am referring work out. Stinks!! I can however hold a phone to me ear and talk you through some things..Originally posted by equin View PostComment
-
Hope you get well soon Terry! Your surgery is it tomorrow?Comment
-
We'll be thinking of you, Terry.Comment
-
Alright, here are some lessons learned for those following this thread who'd like to try making arrows one day.
1. When looking at the grain by the nock end to determine the location of the nock (so that it runs perpendicular to the grain), it helps to put a mark near the nock end of the shaft BEFORE tapering so as to know what direction to place the nock. It's hard for a newbie like me with little knowledge of wood crafting to figure out the grain AFTER the nock end is tapered. You can try using the point end of the shaft, but in my case, the point end was usually the end where I couldn't really tell in what direction the grain was running, either because of the cut of the shaft, the staining process, or whatever. So I'd flip it and see which end was easiest to read, so to speak. Anyway, I use a little sharpie pen to mark the shaft BEFORE tapering so I know the direction of the grain after it's been tapered.
2. For newbies to a Bitzenberger type fletching jig, it may take awhile to figure out the proper 120 degree angle placement when fletching with 3 feathers/vanes. At first I was trying to eyeball it, and while practicing on cheapo wood dowels with left-over vanes, I did a pretty good job. But as luck would have it, when I tried it for real on my new cedar shafts, eyeballing it didn't work, and I ended up with a couple fletch jobs with an almost 180 degree angle! I got the bright idea of using another arrow already fletched at the proper 120 degree angle, and using it to help me place a mark on the jig to know more or less where the 120 degree angle may lie without depending on my unreliable "eyeball" method. Might help if I post pics of what I'm talking about, which I'll try to do when I get home, but thought I'd post about this now that I've got it in my head.
Anyway, I had read from others how addicting arrow-making can be, and man were they right!Comment
-
When using glue-on nocks the position of the nock in regards to the grain of the shaft is not as important as when cutting self nocks into the shaft.
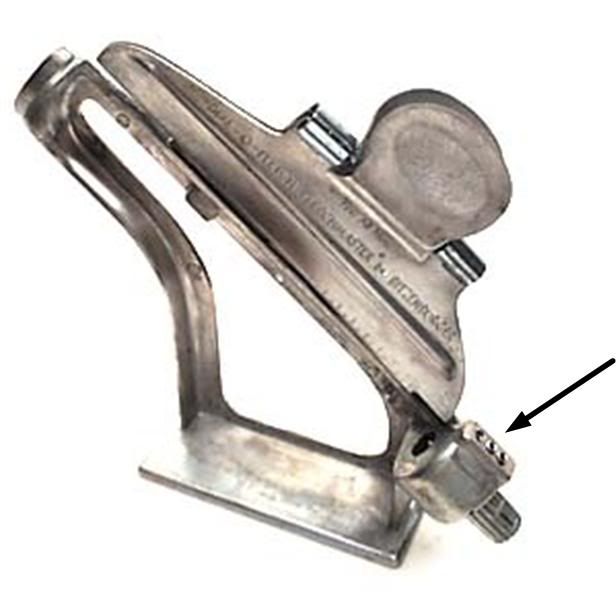
Which Bltzenberger jig do you have? You shouldn't have to eyeball your placement for 3 x120 or 4x90 if you have the dial-o-fletch. There are set screws that give you those percise setting on the jig. The pictures show were these set screws are. The top or left screw iw for 3 x 120 make sure it is screwed in flush and the other two are screwed out. There is an "F" on the knob that indicates the position for your cock/nock feather and you will feel it click. Turn the knob to the next click and that is 120 and placement for the next feather. Hope this helps
Comment
-
Well, Bountyhunter, your post can be added to my next "lesson learned" - lol! I have that very same Bitzenburger jig you posted, and yes, I remember feeling those clicks as I turned the knob around, but didn't know why til now - doh! In my defense, I bought the jig used with no instructions, so I hope I don't appear too stupid in that respect! But thanks a bunch for that helpful info!Comment
-
Oh, and good info to know about the glue-on nocks. I thought they were also supposed to be perpendicular to the grain but mainly for spine purposes?Comment
-
I humbly disagree with that statement. The spine of an arrow will change as the grain is rotated whereby making it easier for the shaft to 1. break 2. not fly the same as the other matched arrows 3. grain to lift upon paradox 4. spine of the shaft will be shot out sooner. No different than the trusses on your house standing on edge or laying flat. Flat grain is never stronger than edge grain given equal thickness. Being off a tiny bit would be ok but not very much. Just an opinion with some physics thrown in.Originally posted by bountyhunter View Post 
Comment
-
Yes, Rubydog is right (of course). I said "not as important as in self nocks" not meaning it was unimportant. Sorry if it was read to mean something different.Comment
Comment