First two are to show his hood/engine cowling done in the same manner as his air intake. Before the shiny coat on carbon fiber. Last pic of the cerakoted foot pedals with grip tape overlays.
-
First two are to show his hood/engine cowling done in the same manner as his air intake. Before the shiny coat on carbon fiber. Last pic of the cerakoted foot pedals with grip tape overlays. -
Had to move the tube on the radiator from the front to around the side, then cap the hole where it was. Not my best effort on this one, kinda got too “busy” with all the weld that had to be in that area. But he was good with it, it’s on the bottom of the radiator, and it pressure tested good/no leaks, so on to the next thing I guess.Comment
-
First pic is just showing a cutout in the carbon fiber for a sensor attachment, 2nd pic is a customized thermostat housing he had me tig the fittings into, then he cerakoted.Comment
-
First pic is with the air speed “stinger” mounted in place, then the part he sent me to weld to mount it with, followed by a drawing he had of what it would look like. Lastly is a wing pic, you can see a fuel cell in the bottom of the pic. Sorry bout being all muddled in the “order”, but I’m struggling with when I load pics they don’t go in the order I intend. I know how it works, last one I click will be at the top… but I’m having a tough time getting my brain to comprehend!
Comment
-
This is the drawing he sent of the latest piece he needs me to weld. “Flaperon Assembly” . I haven’t welded them up yet, a little less than 1/16” material, but should get them done this week. The various pics of the pieces I have to weld are in the other pics. Those little “strips” go along the open side of the bent arms to box it in/stiffen it up. Light as a feather! Have four to do. So if you’ve been following along, you see a common theme here… He seems to always get Ol Unc, to weld stuff that “matters”!! And I ain’t bragging abit! I’m just saying the radiator fails/it overheats, the engine frame truss breaks/engine falls out, thermostat housing cracks/overheats, air speed monitor mount gives way/rips a hole in the wing among other problems, flap (flaperon)control arms break/good luck! I mean, when will he send me something like a step to get in the plane to weld? Or maybe a bracket for some electronics? Either way, this has been cool so far! There has been MUCH MORE done than I’ve shown y’all, but it gives you the idea. I may try my hand at a video, cuz when he’s running that sucker setting the prop pitch/checking thrust, it sounds so dang good! Good Huntin, and God Bless, Rusty
P.S. I’ll try and do better on the updates fellers!
Comment
-
Well the video may be too long? It’s 1 minute 30 seconds. It said something about PHP file to big or something? At least that’s what I think it said before I closed it.") Lemme know if I’m doing something wrong, cuz y’all would like the video. Good Huntin, and God Bless, Rusty
Lemme know if I’m doing something wrong, cuz y’all would like the video. Good Huntin, and God Bless, Rusty
Comment
-
Well, already caught myself on a false statement. The radiator that I relocated the coolant tube on was for a buddies dirt track racer, not the plane. I had done some welding on the plane radiator as well, so maybe that’s why my brain went that direction. Too many pics, and getting old I guess. At this time, I believe all else is correct and factual. Good Huntin, and God Bless, Rusty
Comment
-
I have always been fascinated with planes, and this one is a dang cool build. I'm always impressed with how the STOL aircraft are so light. One crashed on a river sand bar a year or so ago, and a buddy was contacted to remove it. They unbolted the wings, lifted up the fuselage, and loaded it all onto a couple airboats and drove it back up the river fairly easily.
I have a small airboat I'm going to re build, and I'm replacing a PE60 continental engine with a Lycoming IO-360. Not building from scratch like your nephew, but a good project nonetheless. Thankfully if my 70yo engine quits working, I'm already on the ground!
Thanks for the updates, Rusty!Comment
-
Cool deal on the airboat Chase! Good luck on that brother, and thanks! Good Huntin, and God Bless, RustyComment
-
Rusty, I found the run-up video off your nephew's Youtube channel. Here ya go!
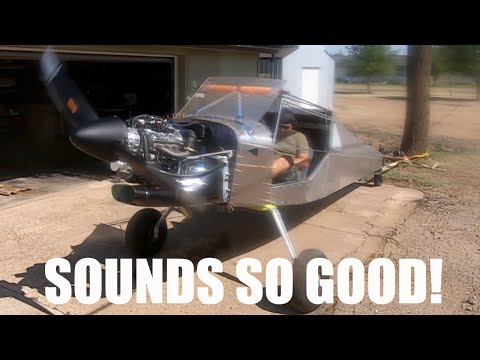
Comment
-
I REALLY appreciate that kmack! I was so floored I actually got the pics on here, I guess I thought I would get the video to load right up. Not so much! Thanks again brother. Good Huntin, and God Bless, RustyComment
-
freaking cool!!Comment
-
One thing that always amazes me (yes, I’m simple minded) is how the camera gets confused with the prop rotation. One way for a min, then the other way, then it looks like it’s stationary. Cool stuff.Comment
-
Its not just you. I was focused on that for a min myself. Every time i see it i do it lol..Originally posted by spidermonkey View PostComment
-
Forgot these. Yes, motor, and all attachments were removed to powder coat flo green. Like I mentioned earlier I believe, I’ve lost count how many times that engine has been in/out. Have to admit, I was surprised he went with the bright, fluorescent color! He’s more of an earth tone guy like me. But he said he wanted to have that “pop” when you opened it up to show the engine. I guess it’ll make stuff stand out better so to speak. Good Huntin, and God Bless, Rusty
Comment

Comment